
Cleaning Activities and Checking Your Work
The goal of cleaning is to leave the work area as clean as or cleaner than when you arrived so that, as a result of your work, leaded dust is not left behind to poison the residents. At the end of this module, you will know how to check your work to ensure the work area is clean enough to pass the visual inspection and cleaning verification procedure, or pass a clearance examination.
By using the techniques described in this module, you will be able to clean a work area quickly and efficiently. Remember, approaching a cleanup is similar to approaching a job. Proper preparation and planning will help make your cleaning efforts more effective and efficient. Always schedule time at the end of each day to thoroughly clean the work area.
What is Effective Cleanup?
Effective cleaning begins with proper preparation and containment. Cleaning will be much easier and efficient if proper containment has kept all dust and debris confined to the work area. While cleaning, keeping dust in the area that is being cleaned is also important. You don’t want to have cleaned areas become re-contaminated after cleaning.
Proper cleaning techniques:
Follow a “top to bottom, back your way out” approach so that you don’t have to re-enter an area that has already been cleaned. Start cleaning high to low.
You should be careful not to spread dust to other areas while cleaning. Follow an ordered sequence of cleaning to ensure that you do not contaminate other areas. For example, if floors are cleaned before the countertops you must walk on the floors to get to the countertops and this risks re-contaminating the floors.
Never re-enter areas already cleaned. Also, countertops are higher than floors and can drop dust onto the floors.
Cleaning all surfaces. The term “all surfaces” includes all vertical surfaces such as walls and windows, and all horizontal surfaces such as floors, door tops and moldings, window troughs, and window sills. Cleaning should proceed from high to low, i.e., from top of wall to window to floor.
Checking your work. Conduct a visual inspection after cleaning is completed. Look for dust, debris and residue.
Perform cleaning verification until all areas pass when compared to the cleaning verification card. A dust clearance examination may replace cleaning verification when required by Federal, state, tribal, or local law, or by the owner.
Safe and secure disposal of waste. Bag and “gooseneck seal” all waste in heavy duty plastic bags. Safely dispose of all waste in accordance with Federal, state and local regulations.
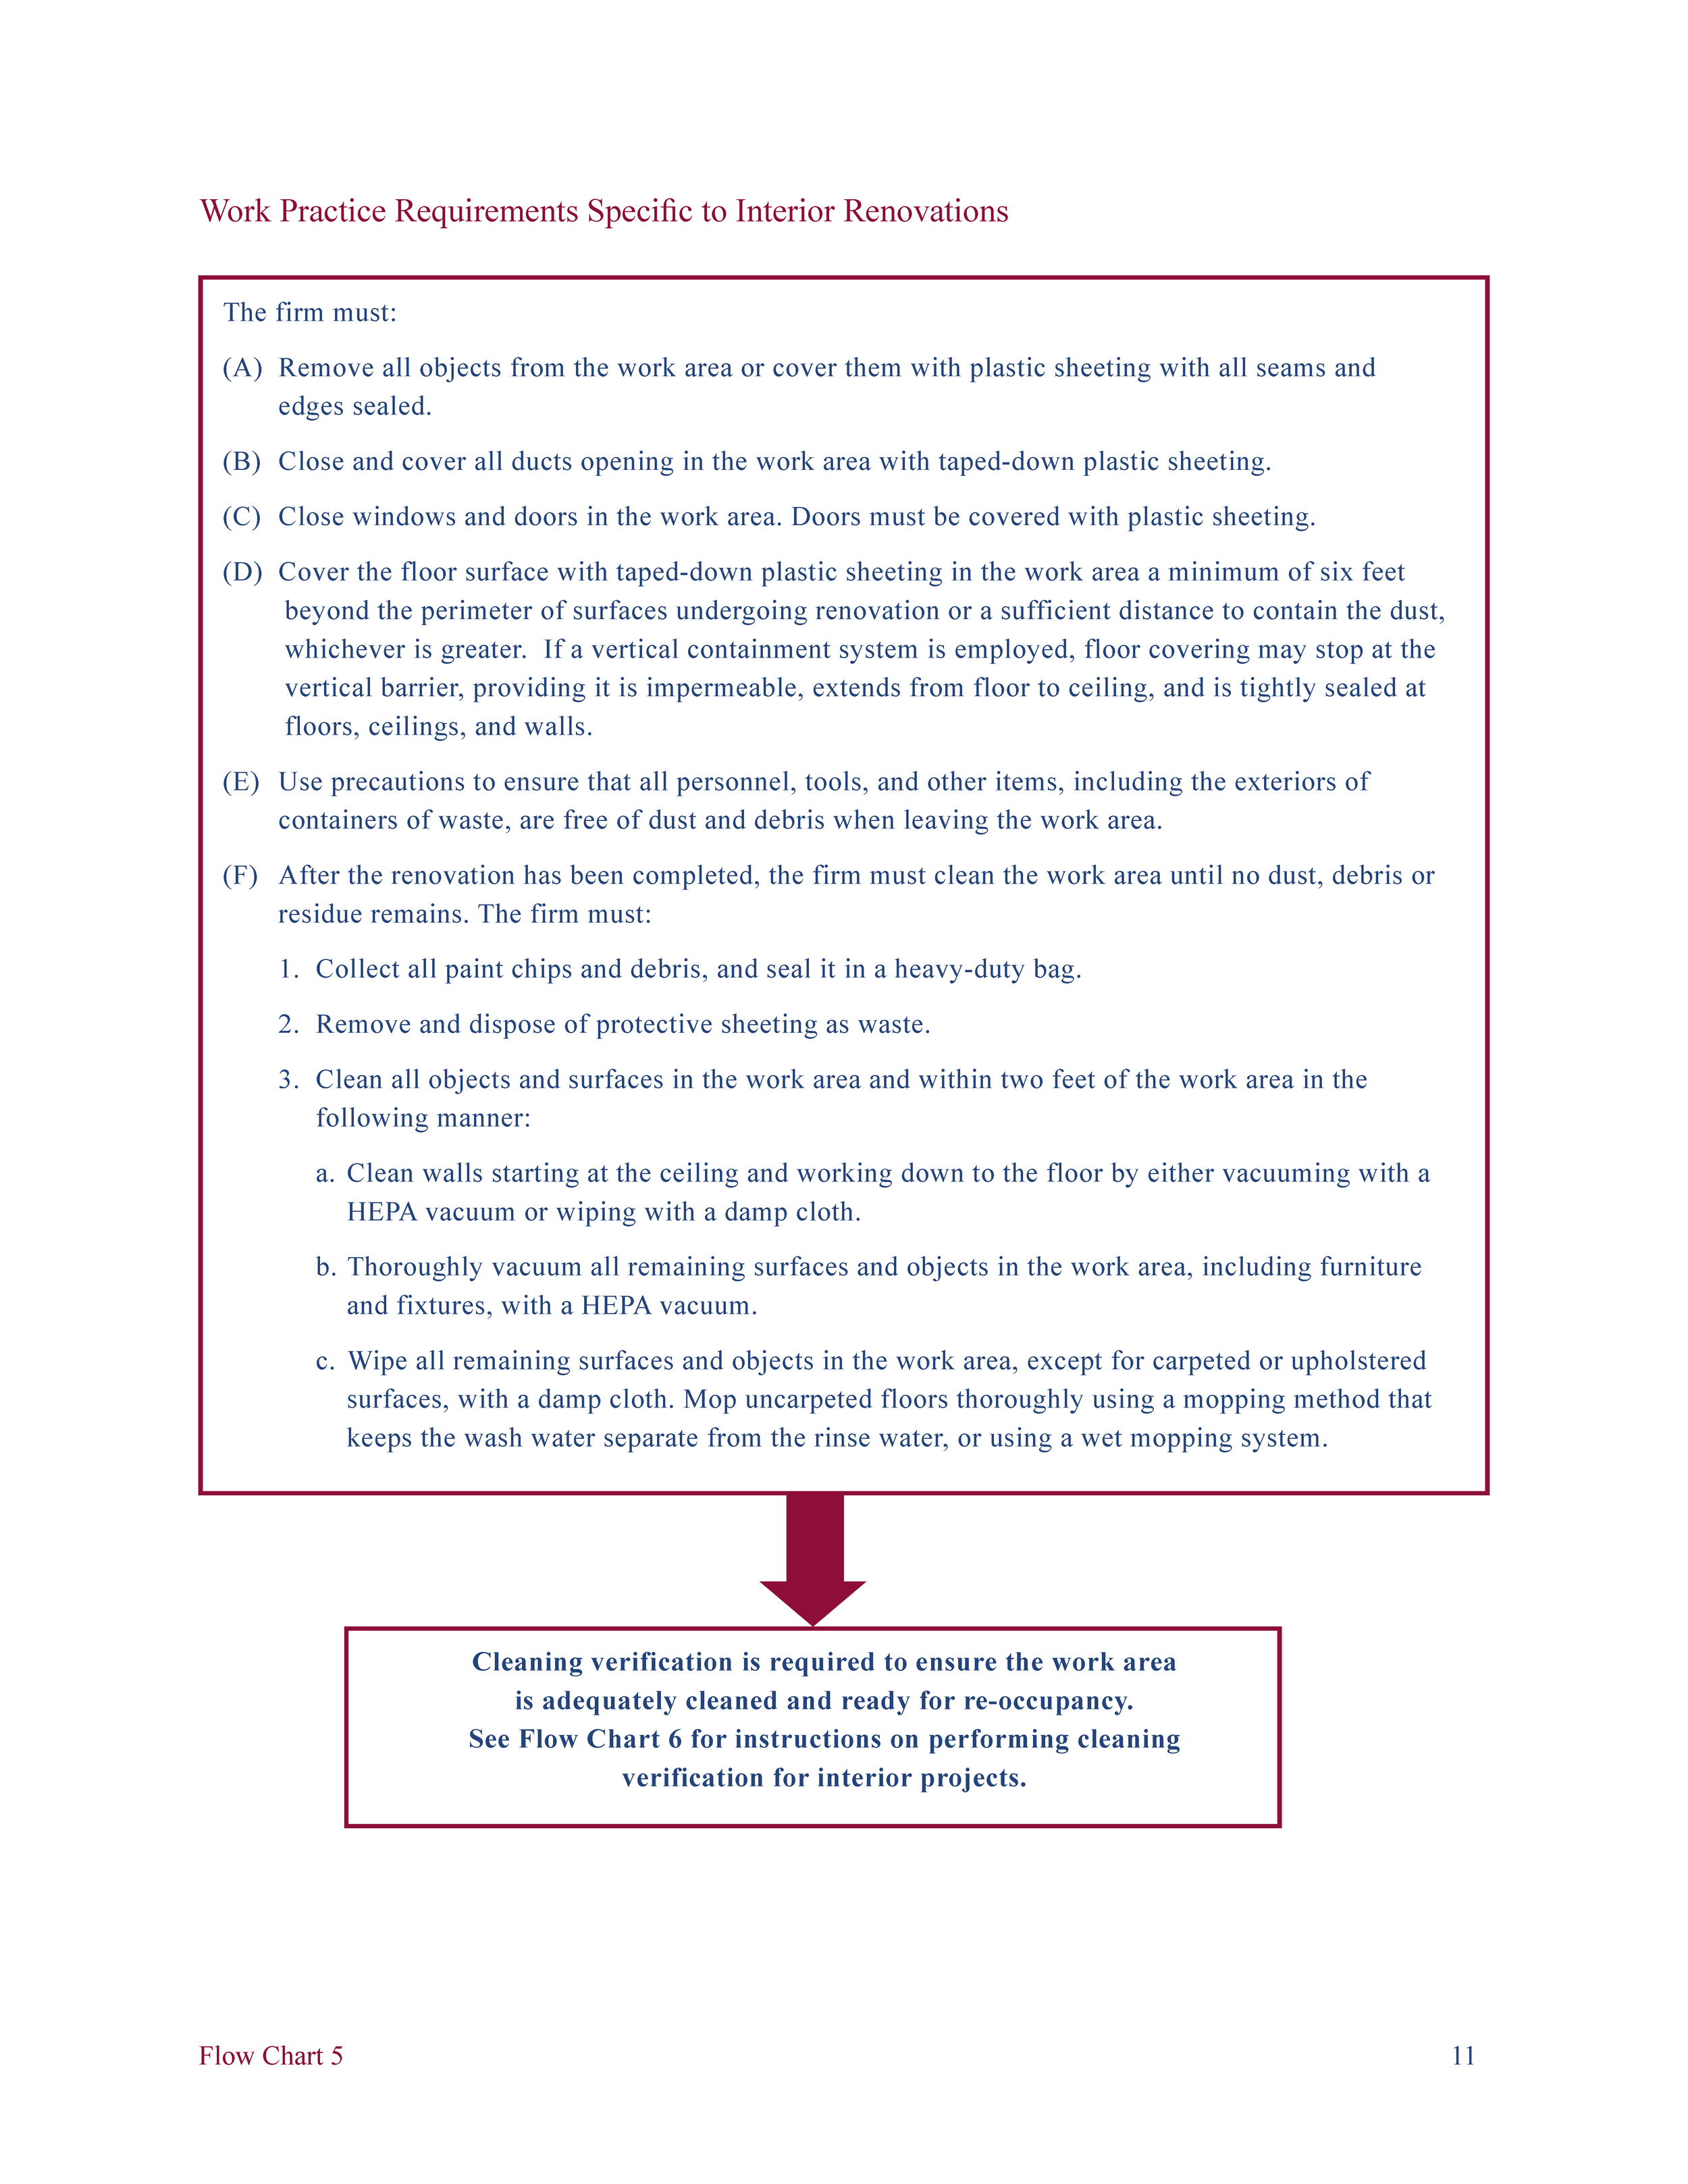
Interior Cleaning Requirements
Collect all paint chips and debris, and seal in heavy duty plastic bags.
Mist, remove, fold (dirty side in) and tape or seal protective sheeting. Dispose of sheeting as waste.
Plastic sheeting between non-contaminated rooms and work areas must remain in place until after cleaning and removal of other sheeting.
HEPA vacuum (operated following manufacturer’s instructions) or wet wipe walls from high to low, then HEPA vacuum remaining surfaces and wipe with a damp cloth.
Clean 2 feet beyond the contained work area.
Use disposable wipes or change cloths frequently.
For carpet or rug, use HEPA vacuum with beater bar.
HEPA vacuum and wet mop uncarpeted floors - two-bucket mopping method or wet mopping system.
Always begin cleaning activities by picking up visible paint chips and debris with a wet disposable cloth without dispersing any of it, and sealing this material in a heavy-duty bag. When the job is complete, mist the sheeting, fold it (dirty side in), and either seal it with tape, or seal it in a heavy-duty bag. Always fold dirty side inwards, and seal with tape or place in a heavy duty plastic bag. If it is placed in a heavy-duty bag, “gooseneck-seal” the bag and dispose of the bag with the rest of your waste. Dispose of all sheeting as waste by using the correct folding and disposal procedure, after it has been vacuumed.
Clean with a Plan. Start cleaning at the far end of the work area and work back to the exit. Clean walls with a HEPA vacuum or by wiping with a damp disposable cloth: Start with the tops of the walls, tops of doors and door frames and work down to the floor. Thoroughly vacuum all remaining surfaces and objects, including furniture and fixtures, in the work area. The HEPA vacuum must be equipped with a beater bar when vacuuming carpeting or rugs. Wipe all surfaces and objects that remained in the work area, except carpeted or upholstered surfaces, with a damp cloth.
Clean the floor last. Clean with a wet mopping system or a two-sided bucket and mop. Clean the entire work area and the area within 2 feet of the work area. If using the two-bucket mopping system, repeat the process using a new mop head and clean water. Remember, always keep one bucket for cleaning solution and the other bucket for wringing out the cloth or mop head. You must keep wash and rinse water separate. Change the rinse water often.
Check your work. Before a Certified Renovator visually inspects the work area, check your work to determine whether dust, debris or residue is still present. If dust, debris or residue is still present, these conditions must be corrected before the visual inspection is performed.
Skilled Cleanup Video
Visual Inspection Procedure
Conducted by Certified Renovator.
Put on disposable foot covers before entering the work area.
Make sure there is adequate lighting in the work area. • Turn-on all of the lights or use a bright, white-light flashlight.
Systematically look for dust, debris or residue on every horizontal surface in the work area and 2 feet beyond. Work from the farthest area from the entry to the entry. Closely examine each surface.
If you find visible dust, debris or residue, then re-clean the work area and repeat step 4.
Once you have carefully looked at all of the surfaces and found no dust, debris or residue proceed to the cleaning verification procedure or clearance.
Visual inspection after cleaning is required by the RRP Rule. Visual inspection is just the first step. A visual inspection must be conducted by a Certified Renovator once cleaning is complete, and prior to the cleaning verification or clearance examination of the work area. In a visual inspection, the Certified Renovator looks for dust, debris and residue.
Make sure that adequate lighting is provided during the cleaning and visual inspection of the work area. You cannot see dust and small paint chips without adequate lighting. Inspect the entire work area and the area 2 feet beyond the work area on all sides of the containment.
Visual inspection of the work area alone will not verify that the work area has been cleaned adequately – visual inspection is only the first step. In many instances, leaded dust is not visible to the naked eye and will not be detected during a visual inspection. Once the visual inspection has been completed and no dust, debris or residue is present, the work area must pass either the cleaning verification procedure or a clearance examination in order for the project to be completed in compliance with the RRP Rule.
Whether the cleaning verification procedure or clearance examination is conducted will be based on regulatory requirements or terms in the renovation contract.
Visual Inspection Video

Cleaning Verification (CV) Procedure
After visual inspection, one of two activities must be conducted. A Certified Renovator must perform cleaning verification or other certified professionals must conduct a clearance examination. The steps for the cleaning verification procedure are explained below.
Using a single, wet, disposable cleaning cloth, wipe the entire surface of each window sill in the work area.
Wipe the entire surface of each countertop and uncarpeted floor within the work area with wet disposable cleaning cloths.
Floors must be wiped using a wet cleaning system, including a long handle device with a head to which a wet disposable cleaning cloth is attached. The cloth must remain damp at all times while being used to wipe the floor.
If the surface of a countertop or floor within the work area is greater than 40 square feet, the surface within the work area must be divided into roughly equal sections that are each less than 40 square feet. Wipe each surface section separately using a new wet disposable cleaning cloth.
Interpret the Cleaning Verification Procedure. Compare each wipe representing a specific surface section to the cleaning verification card. If the cloth used to wipe each surface section within the work area matches or is lighter than the cleaning verification card, that surface section has been adequately cleaned.
If the cloth is darker than the cleaning verification card, re-clean that surface section, then use a new wet disposable cleaning cloth to wipe the surface section. If the cloth matches or is lighter than the cleaning verification card, that surface section has been adequately cleaned.
If the second cloth does not match and is not lighter than the cleaning verification card, wait for 1 hour or until the surface section has dried completely, whichever is longer. Then wipe the surface section with an electrostatically charged white disposable cleaning cloth designed to be used for cleaning hard surfaces. The cleaning verification procedure is now complete and the surface is considered clean.
When cleaning verification has been completed for all of the surfaces in the work area (including window sills), warning signs may be removed.
Cleaning Verification Card

Dust Clearance Examination
A dust clearance examination may be performed instead of cleaning verification. A clearance examination must be a conducted by a Certified Lead Inspector, Risk Assessor, or Dust Sampling Technician. If clearance fails, the renovation firm must reclean the work area until dust standards comply with applicable state, territorial, tribal and local standards.
Dust clearance testing is performed to check the effectiveness of cleaning efforts. In some cases, dust clearance testing may be required as part of “clearance” (a regulation-defined process to ensure that a work area is not contaminated with leaded dust after work is completed). Cleaning verification need not be performed if dust clearance testing is required at the conclusion of a renovation. In such cases, dust clearance testing may only be performed by a Certified Lead Inspector, Risk Assessor, or Dust Sampling Technician. The Certified Renovation Firm is required to re-clean the work area until dust-lead levels in the work area meet the clearance standards.
Some state, local, and tribal laws may require a clearance examination following renovation and remodeling work, to levels that differ from the Federal clearance standards. The selection of a CV or a clearance examination will be based on regulatory requirements or the renovation contract.
Clearance is required in many pre-1978 properties receiving Federal housing assistance. The clearance examination may be scheduled by the agency administering the assistance. A clearance examination is performed by a trained person independent of the renovation firm performing the work. Ask your client or contact the agency administering the assistance to the property to find out if a clearance examination is required at the end of the job and to find out who will schedule it. Remember, if the property fails clearance, the unit must be re-cleaned and another clearance examination performed. Sometimes the cost of re-cleaning and the additional clearance examination will be the responsibility of the contractor. Cleaning well the first time will saves both time and money.
Exterior Cleanup Requirements
Clean all surfaces in the work area until no visible dust, debris, or residue remains.
Collect all paint chips and debris without dispersal, and seal in heavy plastic bags.
Remove protective plastic sheeting and mist before folding it dirty side inward.
Check your work.
Focus on areas such as window sills, bare soil, and children’s play areas. Look for dust, debris and paint chips.
Specific exterior jobs
If work takes place on an exterior porch or stairwell, HEPA vacuuming, wet cleaning and mopping, in addition to a thorough visual inspection, should be used to clean the work area. For such jobs, the cleanup should be similar to cleanup after interior jobs. Collect and dispose of any dust and debris with the rest of your waste.
Avoid dry raking and shoveling, and spreading dust. However, raking and shoveling the soil is appropriate if it is misted first.
Collect all paint chips and debris and, without dispersing any of it, seal this material in a heavy-duty bag.
Remove the protective sheeting. Mist the sheeting before folding it, fold the dirty side inward, and either tape shut to seal or seal in heavy-duty bags. Dispose of the sheeting as waste.
Check your work. Before a Certified Renovator visually inspects the work area, check your work to determine whether dust, debris or residue is still present. If dust, debris or residue is still present, these conditions must be corrected before the visual inspection is performed.

Exterior – Check Effectiveness of Cleaning
Visual inspection
A Certified Renovator conducts a visual inspection after cleaning.
Determines if any dust, debris or residue is still present on surfaces in and below the work area. Including windows sills and the ground.
If dust, debris or residue is present, these conditions must be eliminated by re-cleaning.
After re-cleaning, the Certified Renovator conducts another visual inspection.
When all areas pass, warning signs may be removed.
Checking your work
A thorough visual inspection is the main part of checking your cleanup after an exterior job.
A visual inspection is conducted after completing cleanup, to check your work.
The Certified Renovator must perform the visual inspection to determine whether dust, debris or residue is still present on surfaces in or below the work area, including window sills and on the ground.
If dust or residue is present, clean again, and then repeat the visual inspection. • Warning signs may be removed after passing visual inspection.
Clearance on exterior jobs. For exterior jobs, HUD requires only a visual assessment of the work area to pass clearance. No dust or soil testing is required. If you follow procedures taught in this course you will satisfy HUD requirements.
Disposal
Waste from renovation activities must be contained to prevent releases of dust and debris before the waste is removed from the work area for storage or disposal. Architectural components that are too big to fit into bags must be wrapped in plastic and sealed with tape prior to removal from the work area. If needed, “double-bag” your waste to help prevent the waste from escaping if the bag is cut or ripped. If a chute is used to remove waste from the work area, it must be covered.
Some examples of waste include protective sheeting, HEPA filters, paint chips, dust, dirty water, used cloths, used wipes, used mop heads, used protective clothing, used respirators, used gloves, and architectural components.
At the conclusion of each work day and at the conclusion of the renovation, waste that has been collected from renovation activities must be stored under containment, in an enclosure, or behind a barrier that prevents release of dust and debris out of the work area and prevents access to dust and debris.
When the firm transports waste from renovation activities, the firm must contain the waste to prevent release of dust and debris.
Water used for cleanup might be able to be filtered and dumped in a toilet if local rules allow. Never dump this water down a sink or tub, down a storm drain or on the ground. Filtering waste water through a 5-micron filter may be necessary when lead-contamination such as paint chips and dust may be present in the water. Check with your local water treatment authority, and in Federal and state regulations for more information. Always dispose of waste water in accordance with Federal, state and local regulations
HUD recommends that when building components are recycled or sold, painted building components should be stripped before re-installation. If components are not stripped, they should never be reinstalled in housing.
Disposal – Federal, State and Local Information
According to Federal law:
In housing: Waste can be disposed of as normal household waste.
In non-residential child-occupied facilities: If hazardous waste exceeds 220 lbs, dispose of as hazardous waste.
Always check local requirements!
EPA considers most residential renovation and remodeling as “routine residential maintenance”, the waste generated during these activities is classified as solid, non-hazardous waste, and should be taken to a licensed solid waste landfill. This does not apply to commercial, public or other non-residential child-occupied facilities.
If you generate any hazardous waste, you should determine whether you generate more than 220 pounds of hazardous waste per job site per month. If you have less than 220 pounds of hazardous waste per location per month, manage the waste as solid, non-hazardous waste. If you generate more than 220 pounds of hazardous waste, you should contact your state and local regulators to find out how to properly dispose of it.
Some possible examples of hazardous waste include: paint chips; vacuum debris; sludge or chemical waste from strippers; and, HEPA filters.
Some possible examples of non-hazardous waste may include: disposable clothing; respirator filters; rugs and carpets; protective sheeting; and, solid components with no peeling paint. • All waste should be sealed in heavy duty heavy duty plastic bags and handled carefully.
Always check Federal, state and local requirements before disposing of waste. Some states have enacted more stringent waste management and disposal requirements than Federal regulations. You need to become aware of how Federal, state and local requirements affect the management and disposal of renovation waste in your area.
Exercises: Cleaning and the Cleaning Verification Procedure
Skill Set: Interior Final Cleaning
Skill Set: Exterior Final Cleaning
Skill Set: Bagging Waste
Skill Set: Visual Inspection
Skill Set: Cleaning Verification Procedure
Skill Set: Interior Final Cleaning
Purpose: The purpose of this hands-on exercise is to show students the proper steps for cleaning the interior work area after the completion of the work and prior to the visual inspection and cleaning verification procedure, or a clearance examination.
Time: 10 minutes
Supplies needed:
Heavy duty plastic sheeting
Duct tape
HEPA vacuum with attachments and a powered beater bar
Garden sprayer
Cutting tool (e.g., razor knife, box cutter or scissors)
Disposable wet cleaning wipes
Heavy duty plastic bags
Two-sided mop bucket with wringer (or equivalent), disposable mop heads, long handled mop to which disposable cleaning cloths can be attached; or, a wet mopping system.
Steps:
Wrap and seal, or bag all components and other large materials and then remove them from the work area.
Clean off the plastic sheeting using a HEPA vacuum (this procedure is not required, but it is faster than wiping up dust and debris by hand). Mist the plastic sheeting and fold dirty side inward. Either seal the edges of the folded plastic sheeting with tape or place it in a heavy-duty plastic bag. Dispose of the protective sheeting.
Remove all waste from the work area and place in appropriate waste containers.
Clean all surfaces within the work area and in the area 2 feet beyond the work area until no dust or debris remains. Start cleaning at the top of the walls and work down toward the floor, HEPA vacuum or wet wipe all wall surfaces in the work area. HEPA vacuum all remaining surfaces in the work area, including furniture and fixtures. Use the upholstery attachment for the window surfaces and the crevice tool along the edge of the walls. Use the HEPA vacuum with a beater bar for carpeting. Work from the end farthest from the work area entrance back to the entrance, making sure never to step back into areas that have already been cleaned.
Next, wipe all remaining surfaces and objects in the work area except for carpeted and upholstered surfaces, with a disposable wet cleaning wipes. Also mop uncarpeted floors using a two-bucket method or wet mopping system. Work from the end farthest from the work area entrance back to the entrance, making sure never to step back into areas that have already been cleaned. For carpeted areas, conduct a second pass with the HEPA vacuum using the beater bar attachment instead of wiping with a wet cleaning cloth.
If the property is HUD-regulated, repeat Step 4 for walls, countertops and floors, and then continue to Step 7. Otherwise, continue to Step 7.
After completion of cleaning procedures, check your work. Conduct a careful visual inspection of the work area for visible dust and debris. If visible dust or debris is found, repeat Steps 4 and 5 as needed to make sure no visible dust or debris is present, and then re-check your work with a thorough visual inspection of the work area. When there is no visible dust or debris present, proceed to step 8.
Notify the Certified Renovator in charge of the project that the work area is ready for visual inspection.
Skill Set: Exterior Final Cleaning
Purpose: The purpose of this hands-on exercise is to show students the proper steps for cleaning an exterior work area after the completion of the work and prior to the visual inspection and (if required) the cleaning verification procedure or a clearance examination.
Time: 10 minutes
Supplies needed:
Heavy duty plastic sheeting
Heavy duty plastic bags
Tape (duct, painters, and masking)
Cutting tool (e.g., razor knife, box cutter or scissors)
Flashlight
Disposable wet cleaning wipes
HEPA vacuum with attachments
Two-sided mop bucket with wringer (or equivalent), disposable mop heads, long handled mop to which disposable cleaning cloths can be attached, or, a wet mopping system.
Steps:
Wrap and seal, or bag all components and other large materials and then remove them from the work area.
Clean off the plastic sheeting using a HEPA vacuum (this procedure is not required, but it sure is faster than wiping up dust and debris by hand). Mist the plastic sheeting and fold dirty side inward. Either seal the edges of the plastic sheeting with tape or place it in a heavy-duty plastic bag. Dispose of plastic sheeting.
Remove all waste from the work area and place in appropriate waste containers.
Clean all surfaces in the work area and areas within 2 feet beyond the work area until no visible dust, debris, or paint chips remain. Suggested Cleaning Procedure For Exterior Cleanable Surfaces: Start cleaning at the top of the walls and work down to the floor, HEPA vacuum or wet wipe all cleanable surfaces in the work area, including furniture and fixtures. Use the HEPA vacuum with the upholstery attachment for windows and use the crevice tool along the walls. Work from the end farthest from the work area entrance back to the entrance, making sure never to step back into areas that have already been cleaned.
After completion of cleaning, check your work. This is done by conducting a careful visual inspection of the work area for visible dust, debris, or paint chips on hard surfaces, and for visible dust, debris, or paint chips in the soil areas under the work area protective sheeting. If dust or debris is found, reclean, and then re-check your work with a thorough visual inspection of the work area. Once there is no visible dust, debris, or paint chips present, proceed to step 6.
Notify the Certified Renovator in charge of the project that the work area is ready for visual inspection.
Skill Set: Bagging Waste
Purpose: The purpose of this hands-on exercise is to show the students the proper steps to bag and gooseneck waste, wrap large pieces of debris, and remove waste from the work area.
Time: 10 minutes
Supplies needed:
Used plastic sheeting and used personal protective equipment (from previous exercises)
Dust and debris (from previous exercises)
Heavy duty plastic sheeting
Heavy duty plastic bags
Cutting tool (e.g., razor knife, box cutter or scissors)
HEPA vacuum with attachments
Duct tape
Steps:
Each student should get a waste bag and place some material in it that will be discarded as simulate waste. Do not overfill bags.
Gather the open end of the bag just below the opening into one hand.
Twist the bag so that the neck of the bag twists in the same direction and forms an 8”-10” column.
Fold the twisted column over on itself, in a similar manner to how you would fold a hose over onto itself to cut off the flow of water.
Grasp the folded neck of the bag in one hand and wrap tape around the folded neck to secure the fold in place.
Now wrap the tape about 2 or 3 inches from the top of the fold, several times so that the bag cannot come open. The resulting bags neck looks like the neck of a goose folded back on itself (a goose neck seal).
Use the HEPA vacuum to remove any dust from the exterior of the bags. Carry the bags out of the work area to the appropriate waste container.
Wrapping large pieces of debris:
Cut a piece of plastic so that it can be wrapped around the debris to be disposed of.
Once wrapped in plastic, tape the seams of the package.
Wrap tape around the width of the package in three spots to keep the package from unraveling.
Use the HEPA vacuum to remove any dust from the exterior of the package and carry the wrapped debris out of the work area to the appropriate waste container.
Skill Set: Visual Inspection
Purpose: The purpose of this hands-on exercise is to show the students the proper steps for conducting a visual inspection of the work area prior to conduct of the cleaning verification procedure.
Time: 5 minutes
Supplies needed:
Disposable foot covers
Flashlight
Steps:
Put on disposable foot covers so that you do not track dust and debris into the work area, then enter the work area.
Turn on all of the lights that are available in the work area. Bring a bright, white-light flashlight to make sure there is adequate lighting.
Systematically look at every horizontal surface in the work area, working from the farthest area from the entry to the entry without recovering your tracks. Get close to the surfaces you are inspecting. Note: Remember this is a visual inspection, but the cleaning verification is going to wipe dust up to compare with the cleaning verification card. If you suspect a surface to be dirty, have it re-cleaned with a wet cleaning cloth.
If you find visible dust or debris, re-clean the work area and repeat step 3.
Once you have carefully inspected all of the surfaces and have found no dust or debris, proceed to the cleaning verification procedure.
Skill Set: Cleaning Verification Procedure
Purpose: The purpose of this hands-on exercise is to show the students the proper steps for conducting the cleaning verification procedure.
Time: 15 minutes
Supplies needed:
Baby powder or corn starch
Disposable foot covers
Flashlight
Disposable non-latex gloves
Disposable wet cleaning wipes
Cleaning verification card, one per student to take away and retain
Electrostatically charged, white, disposable cleaning cloths designed for cleaning
Hard surfaces
Long-handled mop designed for wet cleaning wipes
Tape measure
Watch or clock
Steps:
As you enter the work area put on disposable foot covers so that you do not track dust and debris into the work area.
Turn on all of the lights that are available in the work area. Make sure there is adequate lighting.
For window sills: While wearing gloves, wipe each window sill in the work area with a clean, white, damp cleaning wipe.
Compare the cleaning wipe to the cleaning verification card. If the first wipe is the same as or whiter (lighter) than the cleaning verification card, the window sill is clean; continue to Step 6. If the first cleaning wipe is not the same as or whiter (lighter) than the cleaning verification card, re-clean the window sill, and, repeat Step 3 and then proceed to Step 5 (skip this step).
Compare the second cleaning wipe to the cleaning verification card. If the second wipe is the same as or whiter (lighter) than the cleaning verification card, the window sill is clean; continue to Step 6. If the second cleaning wipe is not the same as and not whiter (not lighter) than the cleaning verification card, wait one hour or until the wet surface is dry (for the purposes of this exercise you do not wait). Then re-clean the surface with a dry, electrostatically charged, white, disposable cleaning cloth designed for use on hard surfaces. The window sill is now clean and has completed the cleaning verification procedure.
For Floors and Countertops: While wearing gloves, wipe each floor or countertop in the work area with a clean, white, damp cleaning wipe. For floors, use a long handled mop designed to hold a wet cleaning wipe. For floors, wipe no more than 40 square feet per wipe. For countertops wipe the whole surface of the countertop up to 40 square feet per wipe.
Compare each floor and countertop cleaning wipe to the cleaning verification card. If the first wipe is the same as or whiter (lighter) than the cleaning verification card, the floor or countertop is clean. If the first cleaning wipe is not the same as and not whiter (not lighter) than the cleaning verification card, re-clean the floor section or countertop section, wipe the floor or countertop section with a wet cleaning wipe, and repeat Step 6 for that section and proceed to Step 8 (skip this step).
Compare the second floor or countertop cleaning wipe to the cleaning verification card. If the second wipe is the same as or whiter (lighter) than the cleaning verification card, the floor or countertop section has been adequately cleaned. If the second cleaning wipe is not the same as and not whiter (not lighter) than the cleaning verification card, wait one hour or until the wet surface is dry (for the purposes of this exercise you do not wait). Then reclean the surface with a dry, electrostatically charged, white, disposable cleaning cloth designed for use on hard surfaces. The floor or countertop section is now clean and has completed the cleaning verification procedure.
Once the cleaning verification shows that all areas have been adequately cleaned, remove the signs and critical barriers around the work area.