
Contain Dust During Work
“Containment” is a system of temporary barriers used to isolate a work area so that no dust or debris escapes while the renovation is being performed.
What is containment? There are many degrees of containment, ranging from simple plastic sheeting on the floor surrounding a small work area to a fully enclosed space. Some types of containment are more effective than other types. Containing the work area includes:
Removing objects and furniture from the work area, or covering them with plastic sheeting.
Covering floors (or the ground) with plastic sheeting a minimum distance beyond the surfaces being renovated (6 feet for interior jobs and 10 feet for exterior jobs).
Vertical containment is required for any exterior renovation within 10 feet of the property line. Larger areas of disposable plastic sheeting may also be necessary to prevent the spread of dust.
Smaller areas of containment may be used if additional precautions such as vertical containment are used to stop the spread of dust and minimize the area of cleanup.
Closing windows and doors, and using plastic sheeting to seal doors and air ducts in the work area.
Covering doors used to enter the work area with plastic sheeting in a manner that allows workers to pass through but contains dust and debris within the work area.
Containment is required by the RRP Rule because it:
Reduces the risk to you and residents. Following the work area setup requirements of this module will protect you, your co-workers and residents by confining lead-contained dust and debris to a defined and demarcated area. Confining the lead is an important consideration in avoiding exposure. Reducing the risk to you and co-workers is also dependent upon use of personal protective equipment.
Facilitates efficient cleaning of the work area. The pre-work setup process is essential to keeping lead-contaminated dust confined to the work area where it can be easily cleaned. Proper containment of the work area helps to limit the area you need to clean after the job is complete. Knowing exactly where to clean is an important factor in saving time (and money) spent on cleanup.
Keep Dust Within the Containment
Consider how much dust the renovation will generate. Containment design is a function of the work practices to be used and the expected amount of dust to be generated during the renovation. Plan the size and configuration of containment to keep the generated dust within containment. You are responsible for making sure dust does not migrate out of containment.
If you do not plan and contain the work area correctly, the dust and debris created by renovation can spread beyond the minimum contained area required by the RRP Rule. This means that:
For interior locations, dust may migrate more than 6 feet from the surface being renovated; or,
For exterior locations dust may migrate more than 10 feet from the surface being renovated.
Controlling dust and debris may require more extensive containment than is specified in the rule if the job is particularly dusty. Plan accordingly. In general, renovations that involve only a small amount of paint disturbance create less dust than jobs that involve larger areas of paint disturbance. However, in addition to the size of the area of paint disturbed, the work practices (e.g., sanding) and equipment used will also affect how much dust is created and how the dust migrates.
The location of the work activity also has a bearing on the amount of dust that is distributed. For example, small areas of ceiling work can spread dust over the entire room and are very difficult to control. Required containment is similar for all jobs, but jobs that generate more dust and debris may require protection of larger areas. While the RRP rule does not require vertical containment except for projects within 10 feet of a property line, these systems maybe helpful in limiting the size of the area affected by the work and reduce the area that must be cleaned at the end of the job.
Pre-engineered containment systems (purchased and home-made) are very helpful in cutting time spent on the job erecting containment and are easier to install than hanging plastic sheeting with tape. These systems also allow the contractor to create a sealed room within a room where the dust can be completely contained to a limited and controlled area.
Examples of dusty jobs include:
Hand scraping large areas.
Removing paint with a low temperature heat gun and scraper.
Removing dry residue and paint after using chemical strippers.
Demolishing painted surfaces.
Removing building components with painted surfaces that are in poor condition.
Remember, you are responsible for making sure that dust and debris remain inside of the contained work area. When planning containment, keep in mind how, how much, and where the work practices to be used will create dust, and plan accordingly.
Vertical Containment
What is vertical containment?
Vertical containment means a vertical barrier consisting of plastic sheeting or other impermeable material over scaffolding or a rigid frame, or an equivalent system of containing the work area. Vertical containment is required for some exterior renovations but it may be used on any renovation.
Is vertical containment required for interior jobs?
No, the use of vertical containment is not required for interior jobs, but you can minimize the amount of floor containment needed by making use of vertical containment for interior projects. Floor containment measures may stop at the edge of the vertical barrier when using a vertical containment system consisting of impermeable barriers that extend from the floor to the ceiling and are tightly sealed at joints with the floor, ceiling and walls.
Is vertical containment required for exterior jobs?
Yes, vertical containment, or an equivalent system of containing the work area, is required for exterior jobs where the property line is within 10 feet of the area of paint disturbance. In addition, vertical containment can also be used to minimize the amount of ground containment needed for a project. Ground containment measures may stop at the edge of the vertical barrier when using a vertical containment system.
Example of Vertical Containment
Interior Containment: Limit Access and Post Signs
Restrict access to the work area and notify residents to stay away while work is underway.
Restricting access to the work area will protect residents, especially children and pregnant women, from unnecessary exposures to leaded dust and will minimize the spread of dust to non-work areas.
Before the job starts, notify the residents not to enter the work area and to stay away from the vicinity of the entrance to the work area as much as possible. Residents and pets coming and going can easily track lead-contaminated dust into non-work areas throughout the home. Non-work areas will likely not be cleaned up promptly or properly.
Restricting exposure is especially important for small children under 6 years old and for pregnant women. Be sure to explain to residents that restricting access is for their own protection, and that small children and pregnant women are most at risk of health problems from exposure to lead.
You must provide an indication of how long you will be working in a particular area so that residents can plan ahead to obtain items that they may need from the work area before you begin working. Do not allow eating, drinking, or smoking in the work area.
This is primarily for worker protection, but is also important if residents are living near the work area.
Post signs that discourage eating, drinking and smoking in the work area. Dust in the air can land on food or be inhaled when smoking. If food is set on a dust-contaminated surface, it can easily pick up the lead-contaminated dust, which is then ingested when the food is consumed.
Post warning signs:
Before beginning the renovation, post a sign in the residents’ native language to warn them and other persons not involved in renovation activities to remain outside of the work area.
Signs must remain in place and be readable through completion of the renovation and the post-renovation cleaning verification.
A warning sign must be posted: at each entry to a work area; or, at each main and secondary entryway to a building from which occupants have been relocated; or, for exterior work, where it is easily read 20 feet (6 meters) from the edge of the worksite.
Interior Containment: Remove or Cover Belongings
Where Practicable Remove Belongings and Furniture from the Work Area. It is desirable to remove all objects from the work area including furniture, rugs and window coverings. Removal is the best option for protecting occupant items from contamination and for reducing post-renovation cleanup time (and cost).
If It Can’t Be Moved Out of the Work Area, Cover It. Cover all objects that were not removed from the work area in protective sheeting. Seal the seams and edges with tape.
Completely cover all immovable fixtures, furniture, carpets and other personal items with protective sheeting. Secure protective sheeting to the floor with tape so that no dust can get onto the covered items.
Protective sheeting such as disposable heavy-duty plastic sheeting is commonly used in many remodeling jobs. Protective sheeting can be bought at most hardware stores.
Interior Containment: Cover Floors
Cover Floors. Use protective sheeting to cover all work area floors including installed carpet. The protective sheeting must extend a minimum of 6 feet to the left, right and front – and in some cases to the back – of the area where work will be performed. It should be tightly secured to baseboard or flooring using duct tape (where appropriate), painters tape or masking tape. The corner edge of the protective sheeting should be reinforced using duct tape or a staple. Note: If vertical containment is used floor containment measures may stop at the edge of the vertical containment.
Take special precautions with carpets in the work area. Carpets are a major dust collection medium and it is very difficult to clean the dust out of them once contaminated. When the work area includes carpets, you must cover all carpeted areas that are in the work area with at least one layer of sealed plastic sheeting.
Consider covering shoes with removable shoe covers, wiping off the tops and soles of shoes with a damp paper towel each time you step off the sheeting, and/or using a disposable tack pad that removes dust from the soles of shoes. Immediately place used paper towels in a covered garbage bin. Disposable tack pads can be found at many hardware stores or bought through a supply catalog. A tack pad is a sticky pad that you walk on to remove dust from the soles of your shoes. The disposable tack pad can be taped to an outer corner of the sheeting. Replace disposable tack pads at least daily.
You may find that using a HEPA vacuum to clean off shoes and clothing is necessary in controlling carry-away dust when personnel leave the work area. This is called a “dry decon” and works well.
A second smaller layer of protective sheeting should be used with chemical strippers. This second layer should be taped to the top of the first layer. Place the second layer immediately below the work area. This layer will capture splashes and waste, and allows the mess made by chemical strippers to be cleaned up immediately after use.
Use precautions to ensure that all personnel, tools and other items, including the exteriors of waste containers, are free of dust and debris before removing them from the work area. A container of cheap hand or baby wipes is quite useful for such cleaning.
Interior Containment: Close Windows, Doors, HVAC
Close Windows. Close all windows within the work area.
When conducting window replacements from the inside, consider attaching plastic sheeting to the exterior of the window to prevent spread of dust and debris to the ground and other surfaces under the window. If window replacement affects both interior and exterior surfaces, then setup containment for both the interior and exterior work areas.
For dusty jobs, it is strongly recommended that you seal work area windows with protective sheeting to prevent dust from getting into the trough or on the sill, making it harder to clean.
When sealing windows, cut plastic sheeting layer slightly larger than the window that you are covering.
Attach the plastic sheeting with tape over the window to completely seal it.
Make sure that the tape or the sheeting does not cover part of the area on which you are working.
Close and Seal Doors. Close all doors including closet and cabinet doors in the work area, and cover with plastic sheeting. Doors used as an entrance to the work area must be covered with plastic sheeting or other impermeable material in a manner that allows workers to pass through while confining dust and debris to the work area. As an alternative to putting up plastic, doors may be shut and then sealed closed with painter’s tape.
Close and Seal HVAC Vents. Heating ventilating and air conditioning (HVAC) systems distribute air throughout the building and thus can also carry dust to other rooms. If possible, turn off the HVAC system for the work area. Close the HVAC supply and return vents in the work area and then cover them tightly with plastic sheeting to prevent air from blowing the dust out of the contained work area and to prevent dust from getting into the HVAC system.
Interior Containment: Work Area Entry Doorway
Cover work area entry doors with two layers of protective sheeting. The double layers of plastic on the entry door and other barriers serve as a reminder to residents that people and pets should not enter the work area, and also signals that the area has not yet been cleaned up.
A physical barrier, such as a cone or warning tape, can be placed outside the entry to remind residents to stay away from the work area, especially in buildings where more than one family lives.
When the work area boundary includes a door used to access the work area, cover the door with two layers of protective sheeting as described below. Set up a two-layer entry barrier with closable flaps at the entry to the work area so that workers can pass through but dust and debris stay in the work area. Covering the door with this two-layer system will help contain the dust within the work area. Follow the steps below.
Cut the first plastic sheeting layer slightly wider and longer (three inches) than the door frame.
Make a small “S” fold at the top of the sheeting and tape it to the top of the door frame. Make a similar “S” fold at the bottom of the sheeting and tape it to the floor. This will ensure that the plastic is not taut.
Secure the top corners to the door frame for reinforcement.
For exiting and entering the room, tape a vertical line about the size of a man from floor to header on both sides of the plastic. Cut a long vertical slit through the tape, in the middle of the protective sheeting. Leave about 6 inches at the top and bottom uncut. Reinforce the top and bottom of the slit with tape to prevent the plastic from tearing.
Tape a second layer of protective sheeting to the top of the door frame. This layer is cut slightly shorter than the door frame so that it will hang down flat against the first sheet of plastic.
Tape and secure the top corners of the second layer to the door frame and the first layer. Leave it to hang over the first layer. Weight the bottom of the flap with a dowel to keep it in place. If needed, another weighted flap can be added to the other side of the door to provide a third layer of plastic sheeting.
Overview of Interior Containment Steps
The goal of these interior containment practices is to prevent dust and debris from escaping the work area.
Limit access and post signs.
Remove (preferred) or cover belongings.
Cover floors.
Close windows, close and seal doors and HVAC system.
Construct a work area entry doorway.
RRP Rule: Interior Containment General Requirements:
Posted signs: These must be posted on all sides of the work area to define the work area, must be in the primary language of occupants, must be posted before the beginning of the renovation, and must remain until cleaning verification is achieved.
Contain the work area: Before renovation, isolate the work area to prevent the escape of dust. During work, maintain the containment integrity and ensure that containment does not interfere with occupant and worker egress from the home or work area.
Remove or cover furniture/objects: Remove (preferred) objects like furniture, rugs, window coverings; or cover them with plastic sheeting with all seams and edges taped.
Cover floors: Cover floors including carpets in the work area with taped down plastic sheeting or other impermeable material to 6 feet beyond the perimeter of surfaces undergoing renovation or to a distance sufficient to contain dust, whichever is greater. Remember, if vertical containment is used floor containment measures may stop at the edge of the vertical containment.
Close windows, close and seal doors: Close windows, close and seal doors in the work area with plastic sheeting or other impermeable material. Doors used as entrances to the work area must be covered with plastic sheeting that allows workers to pass through while confining dust to the work area.
Cover duct opening: Close and cover all HVAC vents in the work area with taped down plastic sheeting or other impermeable materials (e.g., magnetic covers).
Remove dust and debris from everything leaving the work area: Use precautions to ensure that all personnel, tools and all other items are free from dust and debris before being removed from the work area.

Exterior Containment: Establish the Work Area
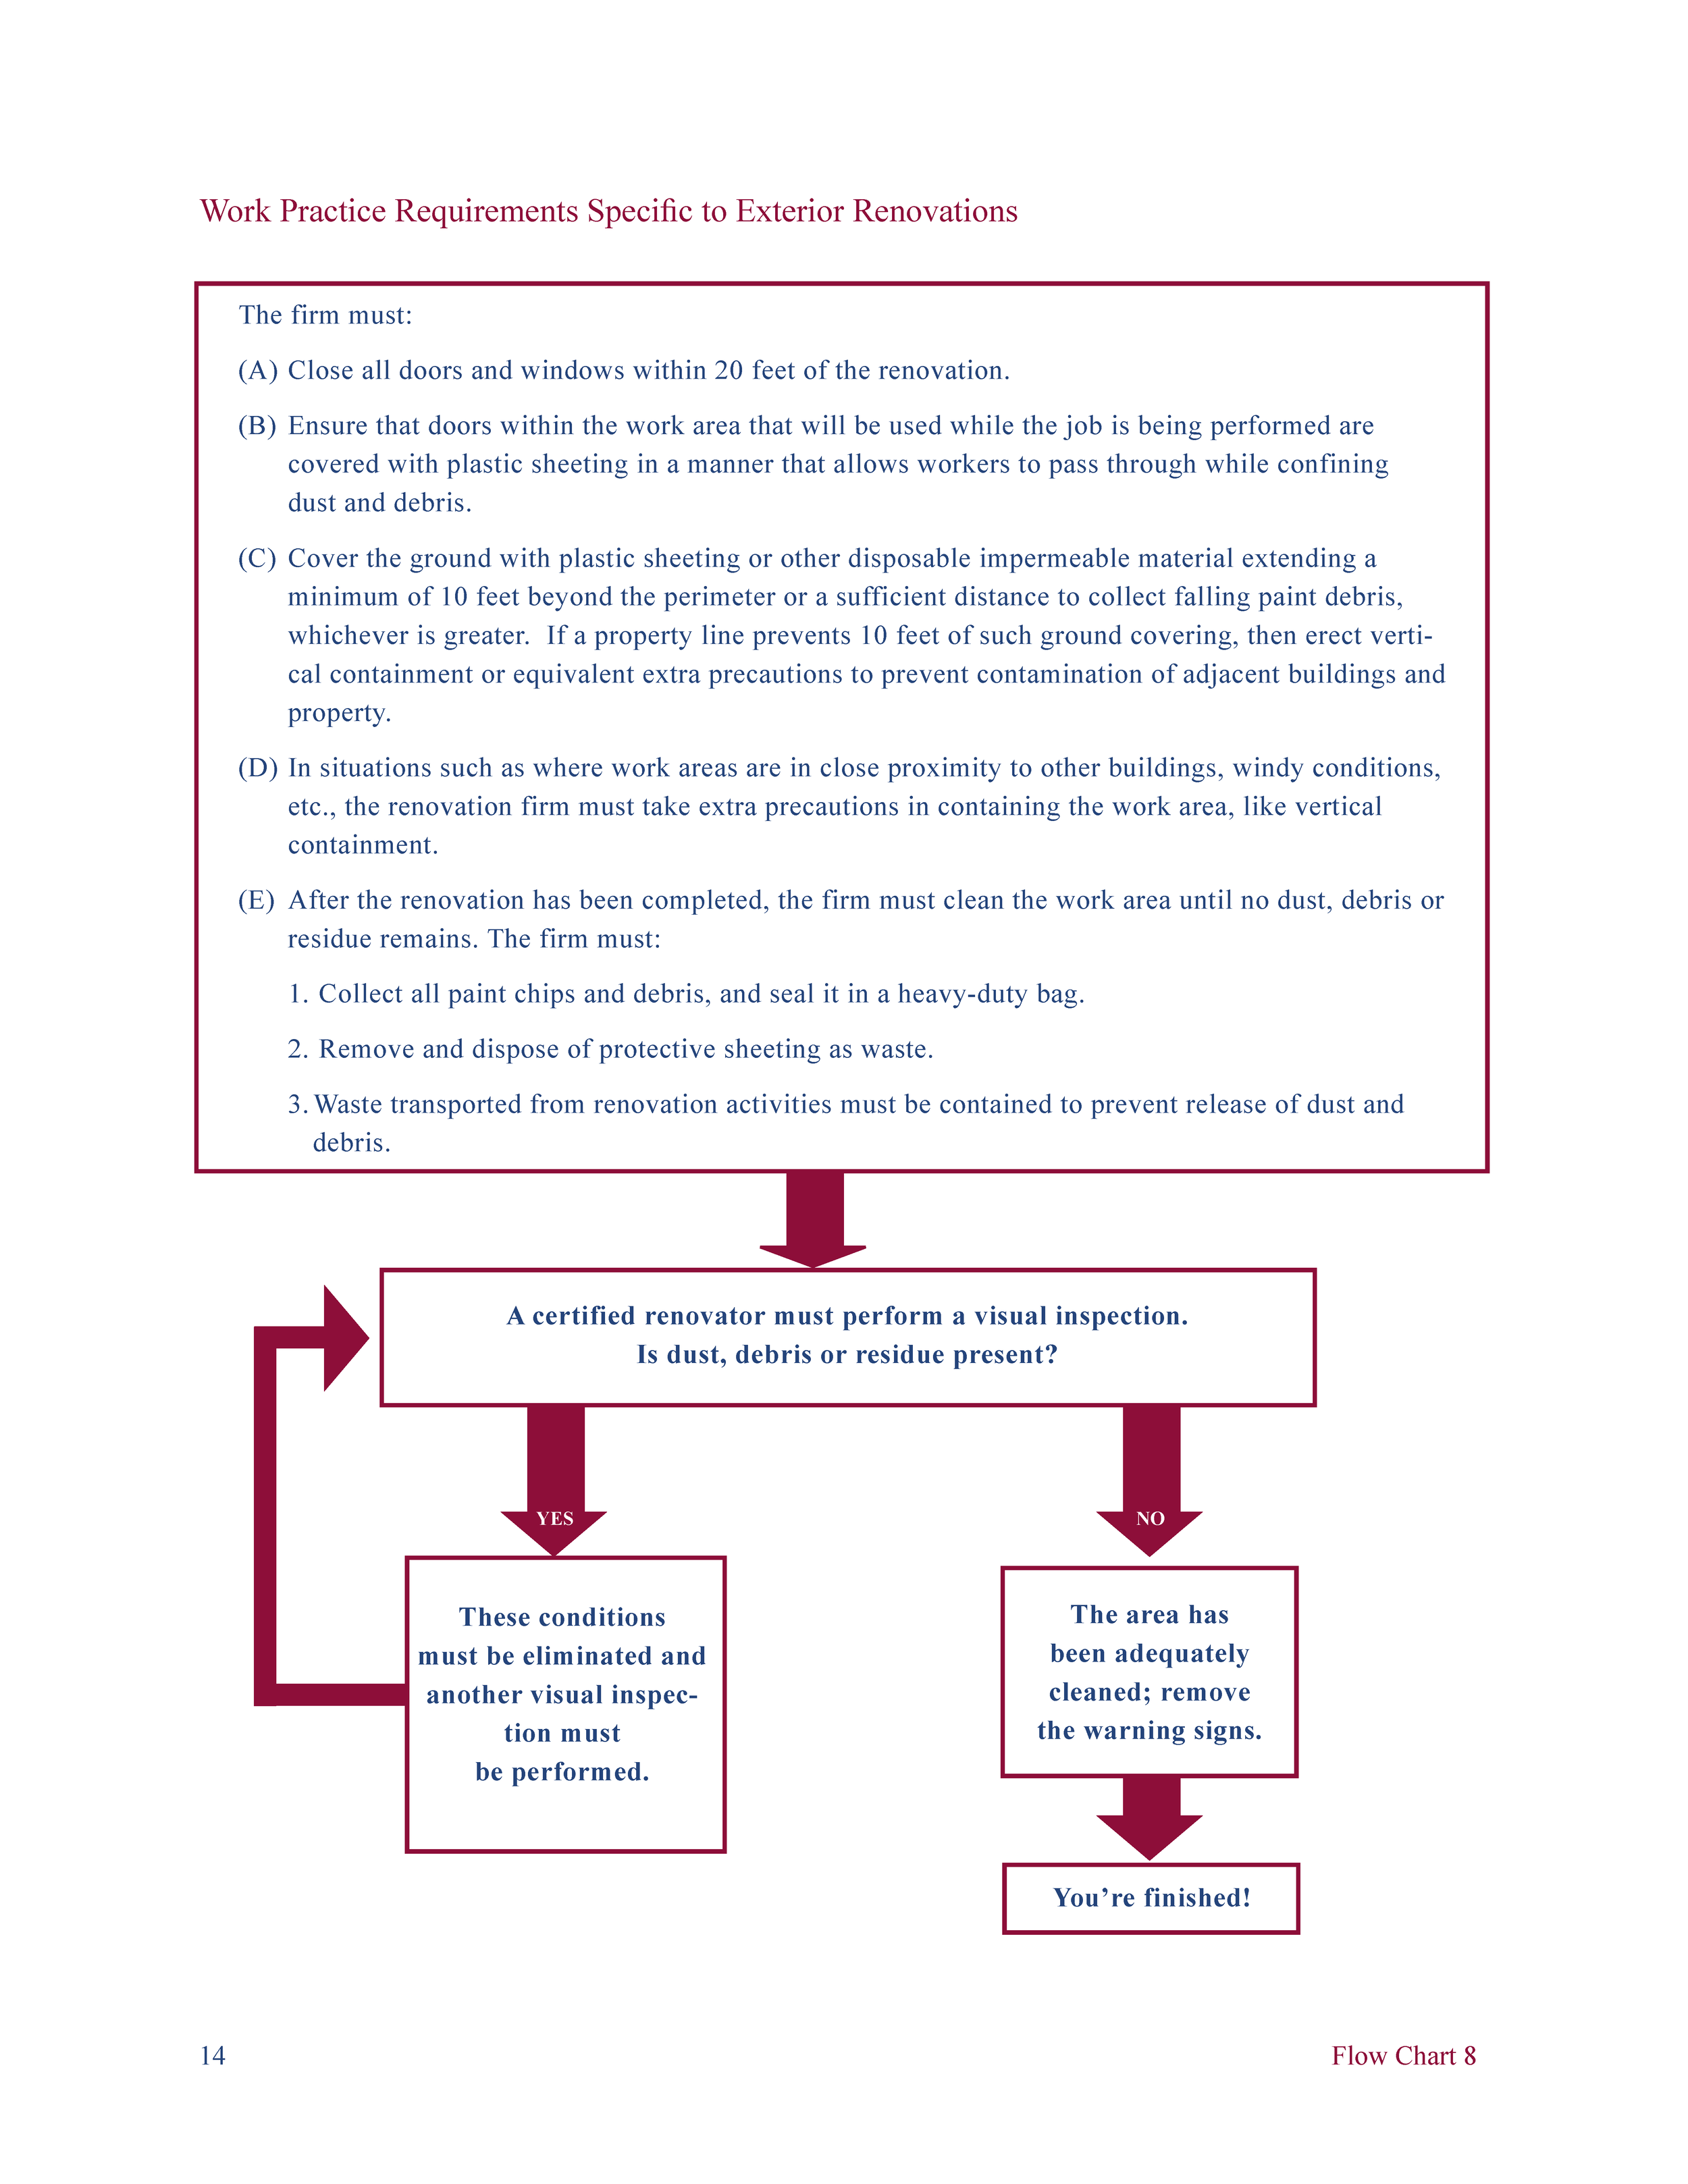
Cover the ground with protective sheeting. Lay protective sheeting on the ground below the work area to at least 10 feet from the house, unless the property line prevents 10 feet of such ground cover in which case the firm must erect vertical containment. Extend the work area farther if needed to collect dust and debris; for example, when paint on the second story of a building is being disturbed. Note: Black and clear disposable plastic sheeting can kill plants by making them too hot. Consider using white plastic sheeting instead.
Remove toys and other items from the work area and cover all play areas including sandboxes.
Protect items that cannot be moved with plastic sheeting. Staple or tape the protective sheeting to the wall of the building, or use a 2x4 wrapped in protective sheeting to hold the material next to the wall. Use heavy objects (e.g., rocks) to weight the other edges of the protective sheeting to the ground so that it won’t blow in the wind.
When using ladders on plastic sheeting consider placing a sturdy piece of plywood on the plastic and then set the ladder on the plywood. This will prevent the ladder from puncturing the plastic and will provide a stable surface for the ladder. If plywood is used, take special care to secure it to the ground so that it does not move. This could be done by staking the plywood and later sealing the holes in the plastic with duct tape.
Note: Remember children often play in the dirt and may put their hands in their mouths while playing. Dirt, dust or debris on their hands will go into their mouths and may be swallowed. Limit work area access
Limit access to the work area by placing orange cones or saw horses and warning tape around a 20 foot perimeter of the work area. Ropes with signs at regular intervals could also be used instead of barrier tape. This will help to discourage residents and passersby from entering the work area. Keep pets out of the work area.
Erect a vertical containment. If the renovation is within 10 feet of a property line vertical containment or equivalent extra precautions in containing the work area must be used. In addition firms are permitted to erect vertical containment closer to the renovation activity than the minimum ground containment distance, in which case the ground containment may stop at the edge of the vertical containment.
Exterior work area daily cleaning. Cleaning the exterior work area is crucial to prevent the spread of dust and debris. Picking up all debris throughout the day and the use of temporary, plastic-sheeting drop cloths can facilitate easy cleanup. Note that the plastic drop cloths do not take the place of protective sheeting on the ground.
Exterior Containment: Close Windows and Doors
Close and cover all nearby windows and doors.
All windows and doors within 20 feet of the work area should be closed to prevent dust from entering the home. Renovators have an obligation to keep the dust and debris from the renovation contained within the work area and contained within the boundaries of the property on which they are working.
If the windows and doors of apartments or condominiums are within 20 feet of the work area, consider requesting that the owners or residents of those affected units close the affected windows and doors in order to comply with the RRP Rule. If this is an unavailable option, other methods of restricting dust and debris to the work area and the work-site property must be considered. These other methods include construction of a vertical containment wall at the property line.
On multi-story buildings, close all doors and windows within 20 feet of the renovation on the same floor as the renovation, and close all doors and windows on all floors directly below the area designated as the work area.
Establish two layers of plastic sheeting on the doors in work areas being used during the job.
In the exterior work area, there will be times when a door into the house needs to be used to access interior work areas. When this occurs, cover this door with disposable plastic sheeting or other impermeable material in a manner that allows workers to pass through while confining dust and debris to the work area.
Exterior Containment: Things to Consider
Jobs Needing Additional Steps. Some jobs may require additional steps to avoid the spread of dust to the rest of a property or to adjacent properties. These jobs might include work in high winds that can carry dust out of the work area and work conducted on upper levels of a building during which even light winds can spread dust beyond the containment as it falls.
Extend the Work Area. The simplest solution may be to extend the area of ground covered by plastic sheeting.
Avoid High Winds Where Possible. Be wary of windy conditions. On days with high winds, it is not advisable to perform dust creating activities. The HUD Rule restricts exterior work in winds in excess of 20 miles per hour. The EPA RRP Rule does not specifically address wind speed, but when the wind is strong enough to move dust and debris, special precautions need to be taken to keep the work area contained. That may mean creating a wind screen of plastic at the edge of the ground-cover plastic to keep dust and debris from migrating.
More frequent cleanup of exterior work areas is also not addressed specifically, but frequent cleanup will help the renovator comply with the requirements to contain the work area and prevent dust and debris from getting outside of the work area.
Ultimately, you are responsible for preventing dust and debris from leaving the work area, so take appropriate precautions to make that happen when wind is a factor.
Overview of Exterior Containment Steps
Establish the work area.
Close all windows and doors.
Establish, as necessary, additional containment to prevent spread of dust to adjacent properties.
Erect Vertical Containment for any exterior renovations within 10 feet of the property line.
RRP Rule: Exterior Containment General Requirements:
Posted signs: Signs must be placed on all sides of the work area to define the area, must be posted in the primary language of occupants, and must be posted before the beginning of the renovation and remain until cleaning verification is achieved.
Contain the work area: Before renovation, isolate the work area to prevent the escape of dust. During work maintain the containment integrity and ensure that containment does not interfere with occupant and worker egress from the building or work area.
Close doors and windows: Close all doors and windows within 20 feet of the work area. For multistory buildings close all windows and doors on the same floor within 20 feet of the work area and all windows on all floors below that are the same horizontal distance from the renovation.
Doors used as entrances to the work area: Cover doorway openings with plastic sheeting that allows workers to pass through while confining dust to the work area.
Cover the ground: Cover the ground with plastic sheeting or other impermeable material extending 10 feet beyond the perimeter of surfaces undergoing renovation or to a sufficient distance to contain dust, whichever is greater, unless the property line prevents 10 feet of such ground cover in which case the firm must erect vertical containment.
Ensure that dust and debris do not contaminate or migrate to adjacent areas or properties: In other situations, the renovation will require extra precautions for containing the exterior work area to ensure that dust and debris does not contaminate other properties, such as when working on multi-story buildings.
The RRP Rule establishes performance standards that the contractor must meet, but does not specify how the contractor must meet them. This allows the contractor flexibility in how to comply with the requirement to ensure that no dust or debris leaves the work area.
Hands-on Exercises: Interior and Exterior Containment
Practice the following Skills:
Skill Set: Setting up Barriers, Signs and Flapped Entry Doors.
Skill Set: Cover and Move Furniture.
Skill Set: Establish Interior Containment.
Skill Set: Establish Exterior Containment.
Skill Set: Setting Up Barriers, Signs and Flapped Entry Doors
Purpose: The purpose of this hands-on exercise is to show students the proper steps in determining where to place critical barriers, and to give them practice in erecting barriers and posting signs to isolate the work area from access by unauthorized personnel.
Time: 10 minutes
Supplies needed:
Barrier tape
Warning signs
Doorway to use for work area entry setup
Cutting tool (e.g., razor knife, box cutter or scissors)
Heavy duty plastic sheeting
Tape (duct, painters, and masking)
Stapler and staples
Broom handle, or dowels, or 1” x 1” x 30” wood or metal stock
Optional: Pre-engineered containment systems may also be used for this exercise.
Steps:
Ask occupants to leave and remain out of the room where work will be done.
Have them stay out until the cleaning verification procedure is complete or until clearance is passed. Install barrier tape to establish a controlled perimeter.
Post a “Do Not Enter” sign at the doorway to the work area. Also post a sign that states that no eating, drinking, or smoking is allowed the doorway to the work area.
Cover the work area entry doorway with 2 layers of plastic sheeting, by doing the following:
Cut first plastic sheeting layer slightly wider and longer than (about 3 inches longer) than the door frame.
Make a small “S” fold at the top of plastic sheeting and tape so that all layers are secured to the top of the door frame.* Make a similar “S” fold at the bottom of the plastic sheeting and tape so that all layers are secured to the floor.* This will ensure that the plastic sheeting is not tight and allows it to give instead of tearing when people move through it. Secure both sides of the plastic sheeting to the door frame with tape.
Staple top corners to the door frame for reinforcement.
For exiting and entering the room, use duct tape to create a vertical line about the size of a man from floor to header in the middle of the plastic sheeting on both sides.* Cut a long vertical slit through the duct tape; leave about 6 inches at the top and the bottom uncut.* Reinforce the top and bottom of the slit with horizontal duct tape to prevent the plastic sheeting from tearing.
Tape a second layer of plastic sheeting to the top of the door frame.* This layer is cut slightly shorter than the door frame so that it will hang down flat against the first sheet of plastic sheeting.
Weight the bottom of the second layer of plastic sheeting by taping a dowel rod to the bottom of the second layer of plastic sheeting with duct tape. This creates a self-sealing flap over the doorway and seals the opening that was cut in the plastic sheeting during step 8.
Skill Set: Cover or Remove Furniture
Purpose: The purpose of this hands-on exercise is to show students the proper steps for determining when and how to cover or remove furniture and belongings from a work area.
Time: 10 minutes
Supplies needed:
Heavy duty plastic sheeting
Cutting tool (e.g., razor knife, box cutter or scissors)
Tape (duct, painters, and masking)
Steps:
Move all the furniture out of the work area. Note: If the training area is small, designate an area against one wall that is “out of the work area”, where furniture removed from the work area can be placed. In a classroom setting, move the chairs and most of the tables to the designated area, and cover the tables.
Cover any large pieces of furniture with heavy plastic sheeting.
Cut a piece of plastic sheeting large enough to cover the furniture and to overlap the floor by 3-6 inches.
Secure the plastic sheeting to the table and/or the floor with tape.
If the furniture will not need to be moved during the work, the plastic sheeting can be secured to the floor using duct tape or masking tape as is appropriate to the surface.
If the furniture will need to be moved during the work, wrap the table with plastic sheeting including the legs and secure the plastic sheeting to the table with tape. Take care when applying tape so that there is no damage to the finished surfaces of the furniture.
Skill Set: Establish Interior Containment
Purpose: The purpose of this hands-on exercise is to show students the proper steps in covering floors, and closing and sealing the doors, windows and HVAC in the work area.
Time: 10 minutes
Supplies needed:
Orange cones
Rope and/or barrier tape (bright color preferable)
Warning signs
Tape measure
Tape (duct, painters, and masking)
Heavy duty plastic sheeting
Cutting tool (e.g., razor knife, box cutter or scissors)
Magnetic covers
Disposable tack pad
Steps:
At each non-entry doorway leading from the work area, place an orange cone, barrier tape, and a “Do Not Enter” sign.
Close all doors and windows leading to/from the work area.
Tape the seams around each door and window casing with painter’s tape, masking tape, or duct tape.
Cut plastic sheeting so that it covers all exposed surfaces within 6 feet of the component(s) that are to be affected by the work.
Secure the plastic sheeting to the floor and walls as appropriate with tape.
Use plastic sheeting floor runners to avoid stepping on the carpet or floors when walking out of the work area. Secure them to the floor with tape.
Close and cover all air and heat diffusers and intakes with magnetic covers, tape, or plastic sheeting and tape. Also, if possible, turn off the HVAC system while working. HVAC units may be turned on after cleaning verification or clearance has been achieved.
Stage all of the tools, supplies and equipment you will need to conduct the renovation, repair or painting work on the plastic sheeting in the work area to avoid contaminating the work area.
Place a disposable tack pad at the corner of the plastic sheeting nearest the entry door to control tracking dust off of the plastic sheeting.
Skill Set: Establish Exterior Containment
Purpose: The purpose of this hands-on exercise is to show students the proper steps for restricting entry to the exterior work area, and to protect the ground under and around the work area from becoming contaminated.
Time: 15 minutes
Supplies needed:
Orange cones
Rope and/or barrier tape (bright color preferable) and fencing stakes
Warning signs
Heavy duty plastic sheeting
Tape (duct, painters, and masking)
Cutting tool (e.g., razor knife, box cutter or scissors)
Tape measure
Disposable tack pad
Steps:
At each non-entry doorway leading into the work area, place an orange cone, barrier tape, and a “Do Not Enter” sign.
Close all doors and windows within 20 feet of the work area.
Place plastic sheeting as ground cover a minimum of 10 feet in all directions from the actual location of a paint disturbance.
Weigh down the edges of the plastic sheeting with 2x4s or bricks or stake down the edges of the plastic sheeting.
Secure the plastic sheeting to the floor and walls with tape or furring strips and tacks.
Place barrier fencing or a rope around the perimeter of the work area 20 feet from the work area and on all exposed sides.
Establish an entry point to the work area and place a “Do Not Enter, No Food or Drinks or Smoking Allowed” sign.
Curb the edges of the plastic sheeting to prevent dust from blowing off. Curbs can be made by running a low rope near the ground and draping the plastic sheeting over the top of the rope. The rope should be only a few inches above the ground. A staked 2x4 may also be used to raise the edges of the plastic sheeting instead of the rope method.
Stage all of the tools, supplies, and equipment you will need to conduct the renovation, repair, or painting work on the plastic sheeting in the work area to avoid contaminating the work area.
Place a disposable tack pad at the corner of the plastic sheeting nearest the entry door to control tracking dust off of the plastic sheeting.